For many macOS users, the Automator app is one of the few default applications installed by Apple they will likely never touch. There is no question it can be intimidating to anyone who feels they don’t have the technical aptitude to create their own workflows. Those thoughts will quickly turn around after giving Automator a try for a few days and realizing it can really help save time on everyday tasks. Read on to learn how to use Automator on a Mac to simplify tasks.
What Is Automator?
Basically, Automator is the ideal solution on your Mac that can do all of your boring and repetitive tasks for you. The best part? It’s built in and totally free. Tasks like renaming or resizing multiple files at once are the perfect reason to learn more about Automator. With Automator, you don’t need any advanced knowledge of coding, scripting or programming, and there are already hundreds of actions and workflows available.
Opening Automator
Opening the Automator app is no different than opening any other application.
1. Open Spotlight, type in “Automator” and click on the Automator search result.
2. Open Launchpad, then type in Automator to locate and open it.
When Automator is open, your next step is to click on “New Document” in the lower-left corner. This brings you to the Automator menu.
Choosing a Workflow
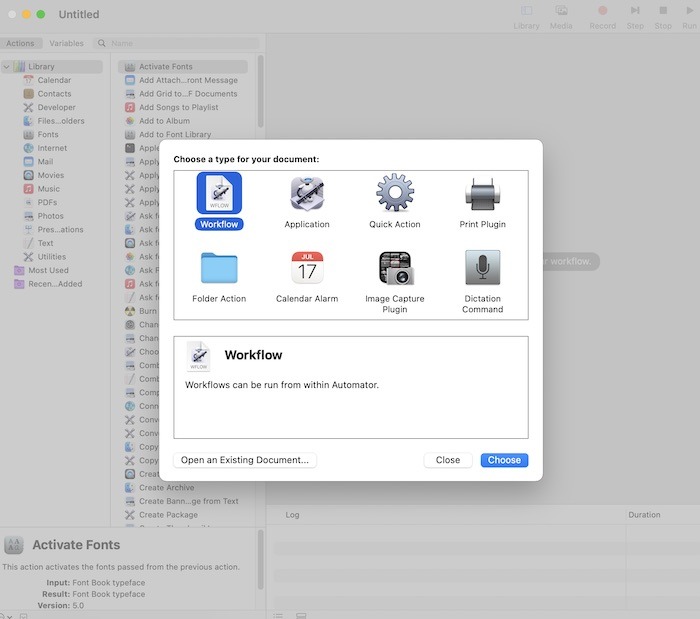
For anyone looking at the application for the first time, it can definitely look confusing. There’s a bevy of workflow options available but nothing to fear, as they are all simple.
- Workflow: it is the easiest way to use Automator and the standard use case –basically any work you can do within the app.
- Application: true to its name, the Application workflow runs whenever you open it, add a file, etc.
- Quick Action: this is best for Finder Windows, the Touch Bar or the Services menu. The most notable part of Quick Action is the Services menu, where you can make adjustments to your right-click menu set whenever and wherever it’s used.
- Print Plugin: this covers any workflow that is available inside your Print dialog. If it involves printing anywhere across macOS, this is where you will create any automated actions.
- Calendar Alarm: as one of the most important workflows for anyone looking to simplify tasks, the Calendar Alarm runs whenever a calendar event occurs.
- Image Capture Plugin: this automated tool helps bring it to life. Essentially, you can choose any action here you want to perform whenever images are being imported from a digital camera, iPhone, iPad, etc.
- Dictation Command: this allows you to control your Mac with your voice.
Add Actions to Workflow
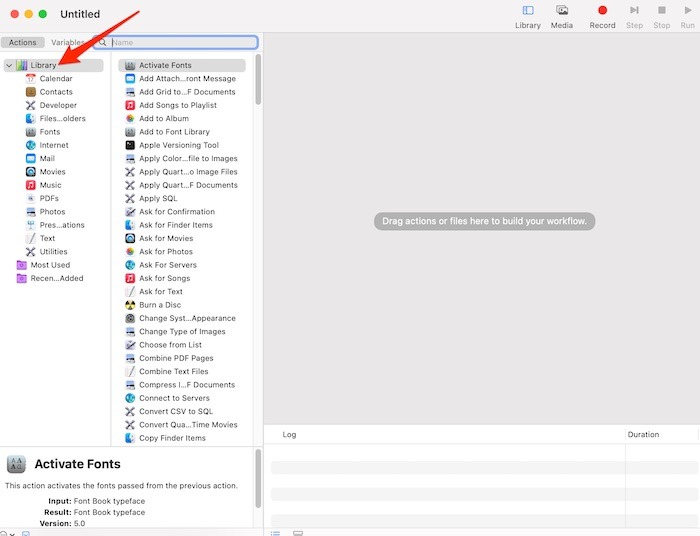
The bread and butter of Automator happens here now that you have a good understanding of what it can do. With the window open, you have two columns on the left.
- “Library” is a collection of all the actions you can take by app or the type of file or data.
- Once you select something in the Library, the second column will show the list of actual actions that can be performed through apps like your Calendar, Mail or Contacts app.
This sets the stage for the most basic of tasks. They are the backbone for each future task you create – no matter how detailed or basic.
Rename Multiple Files
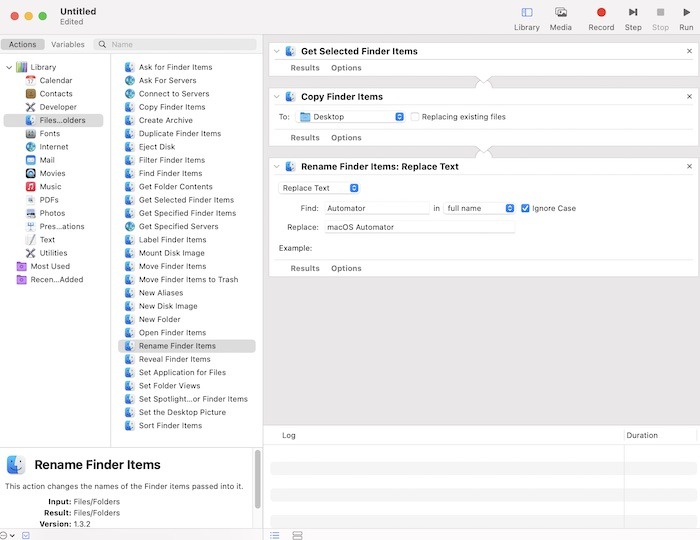
With a basic understanding of Automator under your belt, it’s time to start putting it all together. One tedious task that everyone would love to simplify is renaming multiple files at once. Automate this task and save valuable time.
1. Open Automator on the Mac and choose “Workflow” as your preference.
2. Ensure that “Actions” is selected in the far-left menu at the top of the screen. Look for “Library” and click on “Files & Folders.”
3. On the right side of the screen, identify “Get Selected Finder Items,” then click and drag it into the main window on the right.
4. Look under options in the menu and choose “Rename Finder Items” and drag it into the main window directly below the previous action. A pop-up will open, asking if you want to make copies of any renamed items or change the originals.
5. Look to “Add Date or Time” and select the action you want to use next. Choose “Replace Text” and add the new names for your files.
6. Finally, open Finder and point it to the location of the files you want to rename and select all of the files. Click on the “Run” button in Automator.
Combine PDFs
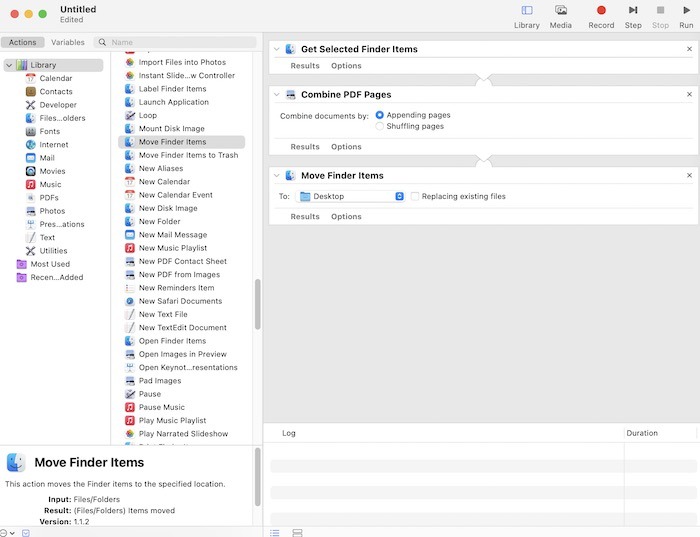
Another basic yet time-saving task is having the quick option to combine multiple PDFs into one.
1. Open Automator and click on “Workflow.”
2. Underneath “Action,” look for “Library -> Files & Folders”. Locate “Get Selected Finder Items” in the menu on the right and drag that into the main window.
3. Return to the far-left menu and locate “PDFs” and click on it so the next set of menu options appears to the right. Find “Combine PDF Pages” and drag it to the main window as well.
4. Choose between “Appending pages” and “Shuffling pages.” The first one is likely to be the best choice for most people.
5. Look back in the middle column and locate “Move Finder Items.” Drag that over to the main window as well beneath the other two options.
6. In the “To” drop-down box, select a destination for your combined PDF. Once you Run the automation, the new PDF will automatically be added to that folder/destination.
Final Thoughts
There is no question that at first glance, Automator can come across as an app that requires a deep working knowledge of macOS. While that isn’t true, what is true is that by taking a few minutes to experiment and play around, you’ll quickly learn how to use Automator on a Mac to simplify your day. Small tasks from opening a preset number of web URLs at the same time each morning to setting up automated birthday messages can be accomplished with Automator.
